It is necessary to update WordPress on time to keep your website safe from any kind of risk. With the update, you will get to use new features in a new WordPress version. There are a bunch of people, who are frustrated with it because WordPress automatic updates don’t work on most development servers and who want to know how to update WordPress manually on the localhost. Don’t worry about that.
Don’t worry! It’s extremely easy.
But keep this mind, before updating WordPress you have to make a backup site (database and WordPress files). As to the save WordPress files, you can download them through FTP client or your online file manager from Cpanel. Alternatively you can also install WordPress backup plugins with which you can back up WP sites (files and database) without manually downloading it.
In this article, we will discuss how to update WordPress manually on the localhost if your auto upgrade fails. You have to follow the below written steps.
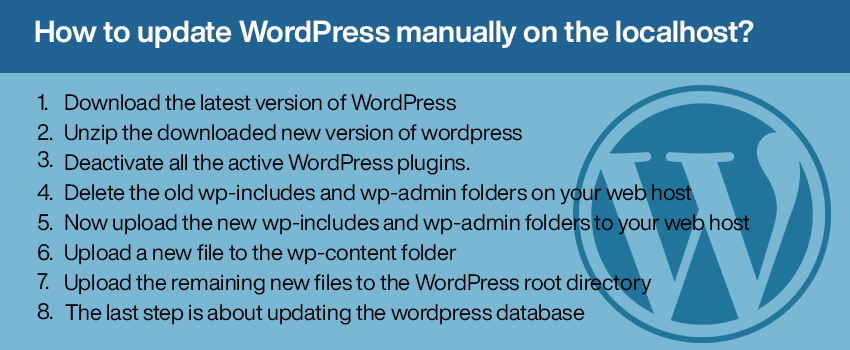
Steps To Update WordPress Manually
- The First thing you have to do is download the latest version of WordPress from this wordpress update download link.
- Now unzip the downloaded new version of wordpress on your computer. To unzip the compress WordPress installer package, you need to install a zip/unzip tool, like WinRAR, WinZIP.
- In the Third step you have to deactivate all the active WordPress plugins.
Steps to deactivate plugins :- Do log in to the current WordPress version dashboard.
- Go to Plugins >> Installed Plugins
- Select all the plugins and deactivate them at once.
- Now you have to delete the old wp-includes and wp-admin folders on your web host so that you can upload new files. To delete files you can connect to your web server through FTP client. Normally they can be found in the domain root to your website.
- After deleting old files, you have to upload the new wp-includes and wp-admin folders to your web host. You can use FTP or shell access to upload the new folders in place of the previously deleted directories(From where you deleted old files).
- once you will upload the wp-includes and wp-admin folders , you have to upload a new file to the wp-content folder. New filles you can find from the downloaded folder on your local hard disk. You have to select those files and upload them to the existing wp-content folder on the web server. It will overwrite existing files on your wp-content folder in a web server with the same name as it was earlier. Other files which already existed will not get affected. And no need to delete those files or folders because they are installed plugins and themes for your WordPress site which are already installed. If you want to delete any installed WordPress theme or plugin, you can remove them later through the WordPress admin panel, once the WordPress manual update will be done.
- After uploading the above discussed three folders, you have to upload the remaining new files to the WordPress root directory. Upload process will remain the same as earlier and there is no need to delete those loose files on the domain root folder because the uploading will automatically overwrite existing files and keep the name the same as earlier. Other customized files such as the .htaccess files, we may need to preserve them and do not worry about your wp-config.php which creates WordPress database connection Because the new WordPress contains the only thewp-config-sample.php file, In the installation package, wp-config.php does not come as a default file.
- The last step is about updating the wordpress database. If a database upgrade is necessary to be compatible with the latest code then WordPress will automatically detect it and guide you to update the WordPress database. You will get a pop-up message to update the WordPress database. Just click the tab and That’s it! Now your version of WordPress is updated.
You can follow the above-written instructions to successfully update wordpress manually on your localhost if auto- upgrading is not working. We hope that will help you out.
- Tags:
- website website ,
- wordpress

